
DIY Childs Bluey Costume for under $12
Happy Fall! I can’t believe it’s October. Time is flying for our little family. Good thing I had a quick solution for a costume because honestly, I forgot all about it. Halloween isn’t my favorite holiday, so why would I spent $50+ on a costume for an 8 month old? I won’t. But, I still want her to be included. Finding an idea for a costume seemed hard at first because she can’t talk yet. It finally clicked on our 25 hour drive home from Ohio. My daughter absolutely loves Bluey, so that’s what she’ll be.
Materials
- Blue Hoodie with Pocket
- Blue Pants
- Hot Glue Gun
- Glue Sticks
- Seam Ripper
- One Sheet of Tan Felt
- One Sheet of White Felt
- One Sheet of Black Felt
- One Sheet of Baby Blue Felt
- One Sheet of Navy Felt
- Handful of Cotton Balls
- Pins (optional to hold down the felt while gluing)
- Printer


Kohls was my first go to with the blue infant outfit. Not only were they on sale, but we got an additional 30% off and had $15 in Kohls cash. It came to roughly $9 for both the hoodie and pants (in Exquisite Blue). The felt was purchase from a combination of Joanns and Michaels, about $0.30 a sheet. Cotton Balls we had at home (I didn’t want to spend money on filler just for a little dog tail). And the Seam Ripper was $2 at Joanns.
It’s only a few dollars more for the hoodie with the pocket. The reason we want the hoodie it to make Bluey’s tail. Start by carefully using the seam ripper to take off the hoodie pocket, and set it aside for later.
After tons of Google-ing, there is no Bluey stencils online to make a costume. That being said, there is a printable mask which I used to make sure the face was proportional. Rather than fit to page, I printed it at 90% scale. I would scale it properly with your hood. Print two copies of the Bluey mask.
I started with cutting all the pieces before assembly. Fold the baby blue felt in half, hot dog style and size the belly with the hoodie that you bought. Then cut out the eyebrow from the mask and lay it over the baby blue fabric to cut two pieces.


With the tan felt, you need to cut one nose and two inner ears. The white felt will be two eyes. Black felt will be used for the two pupils and the nose.
Grab your navy felt and cut out 4 ears and the two sections behind the eyes. For the dots on Bluey’s back you will want one small, medium, and large but size will again be dependent with the hoodie size you have. For the top of the tail you want to read below to match it with the hoodie pocket folded in half (see the pocket below).


For the tail, fold the hoodie pocket in half (inside out) and cut off the excess edges (both top and bottom) as pictured. Leave the cuts at an angle so when we attach it to the pants, it sticks up.
Place a thin layer of hot glue to fuse the pocket together. Then turn it correct side out. Use the width to size the top of the tail.
You can hot glue the top portion of the tail as well, then stuff with cotton balls. Make sure you pay attention to which direction the tail will be glued onto the pants, it will either go up or down.

Carefully put a thin layer of glue on the bottom of the navy felt tail tip and wrap it around the tail.
Also glue the side of the tail tip together. Stuff with cotton balls then glue the top shut.
Then you can glue the tail to the back of the pants. I recommend putting the pants on your child before glueing. My daughter wears cloth diapers so the tail is lower than I expected it to be.


Set your pants aside and lets move onto the hoodie!
Glue the tan inner ear onto the navy ears. Put a thin layer of glue on the sides of the ears and put a cotton ball inside.
Then you’ll fill the rest of the bottom with hot glue and put it on the top of the hoodie. Make sure that they are evenly placed. There is a photo below for reference.

Flip the hoodie over and glue the three dots on the back.
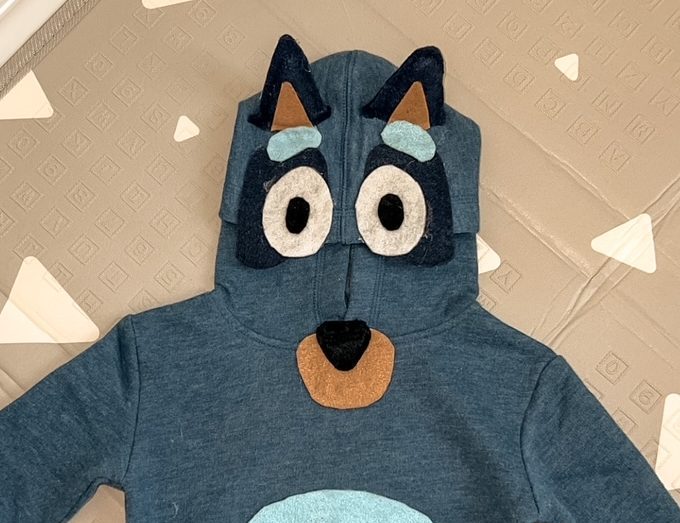
Then glue the eyes as pictured. I let them come off the top of the hoodie a little bit.
I also made sure the eyebrows covered the bottom portion of the ears.


We’re almost done if you can believe it! This only took me one day to finish, especially being so easy with the hot glue gun.
I used pins to make sure the baby blue belly portion stayed straight while I glued it on.
Then I glued it in sections so it stayed straight.

The last step is the nose! I decided to glue the nose on the bottom of the hoodie so it didn’t interfere with my daughter’s face. She’s too small for a mask and this is the perfect solution and looks pretty good when she’s wearing it!
Your costume is all done! One thing I love about this is that it will keep our daughter warm on the cool October night. And the fact that it’s handmade from mommy making a wonderful memory for our family. Happy Trick-or-Treating!


Kelley | 4th Oct 23
This is ADORABLE! I’m so impressed! I’m totally with you on DIY Halloween costumes. Last year, my daughter was the sun, and I just pulled out a few yellow items from her closet and made a sunburst headband. It ended up being so cute, and soooo much less expensive than buying something new that she’d wear just once.
Mandy | 4th Oct 23
That Bluey costume is SO cute! What’s even better is no-one else will have this costume. Your daughter will be one of a kind. Great job.
Hannah | 4th Oct 23
This costume came out SO good! I’ve always been afraid to DIY my kids’ costumes because I’m not very crafty. You made this look pretty easy!